Editing our Film Noir was probably the most technical and hardest part of the overall project. Once we had finished filming everything we began to edit using iMac computers. We uploaded all of our footage from the HD camera's onto the computer using the USB lead. Once they were onto the computer we transferred them all to 'Final cut express' (our editing program used). As a group we would discuss the editing and decide on how things were to be done, we would all come to agreement on something and apply it to our film.
The whole idea of a typical film noir is that it's in black and white. To achieve this film noir convention we firstly clicked 'Effects' > 'Video Filters' > 'Colour Correction' > 'Colour Corrector'.
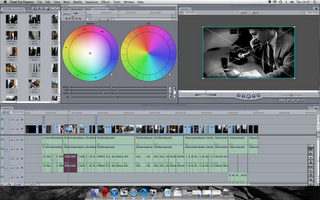
Once we reached the final step and clicked colour 'Colour Corrector' it opened up a new tab, which looked like the following image.
Here is the next step of the editing process and achieving the black and white effect. The new tab will show two colour wheels, with slider options beneath both of these wheels which adjusts the saturation of the image. This was quite a simple process and all it involved doing was sliding the saturation bar to the end furthest left. As you can see in the image the film is now converted into black and white.
After converting the clips to black and white, we watched the footage that we had so far and came to the conclusion that everything was a bit too flat and compared to a typical film noir, it didn't really have that mysterious feel. So next we searched around in 'Effects' > 'Video Filters' > 'Stylize' and applied many different filters, and we chose to use 'Vignette'. Overall this gave the clip and footage a darker edge, and made it look mysterious and gloomy, just how a typical film noir should appear.
Through out the editing process we had to cut a lot of clips down, as they were either too long or there was footage on them that wasn't needed. Especially as the film had to be around the five minute mark. So using the cut tool, which you can see on the far right of the screen, we would hover over the clip and click the part we didn't want and simply press delete.


No comments:
Post a Comment